
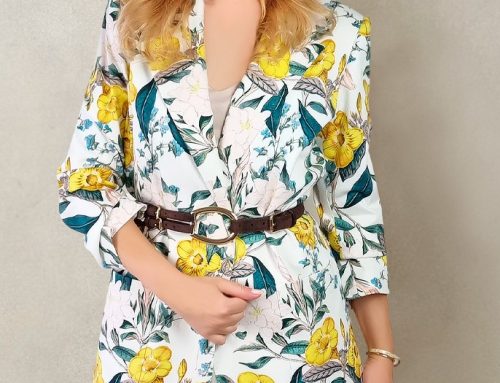
A classic jacket is a wardrobe staple that never goes out of style. With a semi-fitted silhouette, set-in sleeves, a traditional collar, and a sophisticated double-breasted closure, this jacket offers elegance and structure. Best of all, an easy video tutorial is available to guide you through the process, making it a great project for intermediate sewists.
To access this free pattern, registration is required. The pattern includes an ease allowance of 6.0 cm for a comfortable yet tailored fit. Seam allowances are set at 1 cm, while the hemming allowance for the sleeves and bottom is 4 cm.
Fabric Requirements
Depending on the size, fabric consumption varies:
- Main fabric: 1.5 m (size 42) to 2.5 m (size 60) with a width of 1.5 m
- Lining fabric: 1.4 m (size 42) to 2.4 m (size 60) with a width of 1.5 m
Cutting Details
From the main fabric:
- 2 front pieces
- 2 side front panels
- 2 back pieces
- 2 back side panels
- 2 sleeve upper parts
- 2 sleeve lower parts
- 2 collar pieces
- 2 facing pieces
- 2 valance pieces
- 1 neckline facing (cut on fold)
From the lining fabric:
- 2 front pieces
- 2 side front panels
- 1 back piece (cut on fold)
- 2 back side panels
- 2 sleeve upper parts
- 2 sleeve lower parts
- 4 pocket lining pieces
Additional Supplies
- 4 spools of thread
- 12 buttons
- 1.0 m of fusible interfacing
Sewing Instructions
Begin by reinforcing key components with fusible interfacing, including the front panels, side panels, collar, facings, and valances. The back panels and sleeve vents are partially reinforced for structure.
- Assembling the Main Pieces:
- Sew the back center seam and press open.
- Attach the back side panels to the back and press seams open.
- Sew the front darts, trim the seam allowance to 1 cm, and press open.
- Attach the side front panels to the front pieces and press open.
- Creating the Pockets:
- Mark pocket placements.
- Fold facings in half lengthwise and press.
- Stitch facings to the front pieces along the pocket openings, cut and turn right side out, and press.
- Assemble pocket bags and attach them to the pocket opening.
- Constructing the Collar and Facings:
- Sew the shoulder seams of the main fabric and press open.
- Attach the facings and neckline pieces, pressing seams apart.
- Sew the collar pieces together, turn and press for a crisp edge.
- Attach the collar to the neckline, ensuring a clean finish.
- Sewing the Sleeves:
- Hem and shape the upper sleeve vent.
- Assemble the upper and lower sleeve parts.
- Press and shape the sleeve for a tailored finish.
- Insert shoulder pads for added structure.
- Lining and Finishing Touches:
- Assemble the lining, leaving an opening for turning.
- Attach the lining to the main jacket along the facings and neckline.
- Align and secure the jacket hem with the lining.
- Sew buttonholes and attach buttons.
- Give the jacket a final press with steam for a polished look.
This classic jacket is an excellent addition to any wardrobe, offering both style and functionality. Whether paired with tailored trousers or worn over a dress, it exudes sophistication and timeless appeal. With the help of the detailed video tutorial, you’ll find the sewing process smooth and enjoyable. Happy sewing!
Source: YaSew.ru


Leave A Comment